Sunday, July 30, 2017

Refrigwhat

Thats pretty much it. What is refrigeration? Well. Its nothing new technology wise. It does require a decent amount of electrical juice though and Im fresh out of juice. Actually I use zero electricity most days. The cell phone is the only electrical device used daily and that is powered between a balance of charging while driving my truck or portable battery packs that are topped off also in my truck or by a 20 watt portable solar panel. Thats it. The power tools are all cordless and I charge them at a neighbors house which I find to be quite the luxury. The lifestyle isnt for everyone but I cant see myself going back.

Back to refrigeration, we have none. I do miss it but theres ways around it. Simply dont buy foods that require refrigeration. Problem solved. Okay theres some things we like to eat that require refrigeration, like yogurt. How long will yogurt last without refrigeration? 3 days in a cooler (no ice). Salad greens last 2 days. Meat lasts 2-4 days depending on type and packaging. Its been a fun experiment albeit a bit wasteful at first (more compost!).

There is a lot of misinformation out there, I wont get into the political side of things Ill just simply say, we are led to believe a lot of things that are wrong. Eggs do not require refrigeration unless theyve been washed or refrigerated (as in they must continue to be chilled once chilled). We eat month old eggs. Theyre great. Meat can be stored in various ways, salted (still playing with this) smoked and dried. A lot has been forgotten over time and as conveniant a refrigerator can be, theres ways around it. If theres anything Ive learned in life, where there is a will there is a way. Always.

With that said, eventually we'll have a small cooler turned into a refrigerator of sorts (many methods), its dependant on what I cook up for a permanent solar installation. In the mean time there is this:


Old freezers are free. So a free freezer gets buried in the ground as a pseudo root cellar.

Bunch of holes drilled in the bottom and a vent stack. I later cut the stack down to ground level, didnt really need to be that high. At first it was holding 62 degrees. 55-58 is ideal. As the summer heat came on Im now seeing 70 degrees. No good. Perhaps more dirt. More holes in the bottom (where the dirt is cool). I dont know, still playing with it. Ideally its to store salted meats and root vegetables. Ill figure it out, thats the fun of free projects. Learning at little to no cost.

Give me heat

An essential part to being semi-comfortable over winter is a heat source. Being off grid with acreage its a no brainer to use wood.


With a good amount chopped last year it didnt take long to fill up
the wood shed. The purists will say burn only specific hardwoods. Im burning everything cause I can. The property has a lot of standing dead along with toppled over dead trees. In an effort to clean things up as the forest grows, I find that balsam is the majority. It burns hot but short. Itll do. The real challenge is what to burn it in. Craigslist to the rescue.


It isnt pretty but I always put in the extra labor to save money because as they say, a penny saved is a penny earned. Truly I find great enjoyment on learning, fixing and rebuilding things, not so much as just being frugal. The stove is a Reginald 102, last imported from Ireland in 1977. I was on the prowl for a Jotul 118 but the name drives a much higher price. The 102 is the same design, long firebox with a "cigar burn" style. As seen here:


I like the idea of having a 24" firebox. No its not wide but the timber on my land is not very mature so being able to burn longer thin sticks is highly desireable. We'll see how winter goes. With some wire wheel grinding, new paint and gaskets I really like it. Completely oversized for our square footage too!


If it doesnt work then Ill deal with it then. The rocket stove craze has recently caught my eye and I may abandon the woodstove completely. Thats another story though.

Saturday, July 29, 2017

No mo' solo

With the roof on I was pretty dang happy. It meant that the house would be fine for quite some time. The following day we knocked out another project, the french doors.


French doors for 2x6 framing is $300 more than a 2x4 framed one. Yeesh. I made the 2x4 one work with 2x6 framing. I understand how houses cost so much. Youre gouged at every opportunity for "specialized" crap. Granted Im saving tons by doing all the labor, it still irks me that there can be such a price difference. Its a damn door. And its done. Sort of. I had to reset the doors twice after the spray foam pushed it out of place. Sometimes spray foam causes more trouble than its worth and yes it was the windows/door foam.

I returned to NY to get Tamarra and our stuff. Yeah. Stuff. Moving into a house that is this far from being finished is not recommended. We made it work. But really. Dont do it. Its great being able to look back at that time.


Got myself a permanent onsite helper. As much as I like working alone there is a lot that is much easier with a second pair of hands and eyes. The projects really came on quick now.


Roxul insulation. Preferred over fiberglass, easier to install, higher R value, doesnt promote mold as much as fiberglass and so on. It was a fairly involved project still. Cats getting in the way and whatnot.


The cathedral ceilings got reflectix to hold up and the roxul insulation and add a little R value. Its completely overpriced reflective bubble wrap but sometimes...whatever.


Its amazing how far weve come. Its been a year since I first started digging. Now even the bathouse is installed. Speaking of the bathouse...


Procuring a strong enough pole for bathouse was deemed impossible. New poles are hundreds of dollars. A used basketball pole might suffice. Couldnt find one and got impatient. So some good ole black iron pipe was used. Smaller size for the second half so it could slide inside the lower half. The house can be raised and lowered that way. It was no easy task to heave the house up there in the first place. Especially when you realize that you installed the pole between the rungs of your ladder...sigh. So the bathouse got installed twice. I make mistakes, Im good at correcting/hiding them, but this one was too comical to let go.

You need a roof

Yes. A roof is up there in the more necessary category. Those that know me are aware of my flying by the seat of my pants habit. Its hard to describe the balance between planning and going with the flow. Its so hard I wont desribe it. Flat out refuse. Point is, when building a structure for living in there is many ways to arrive at the same point. The sheathing and tarp held up over winter, bless its soul. If I look around the region there are quite a few perma-tarped structures. I dont want to be one of them. Maybe I do have a little class afterall. The tarp slapping in the wind is enough to annoy me and springtime is very windy here in Maine.

The design. Ah the design. It changes and changes some more and its never final until Im done (screws and nails can be removed).

The greenbox. I needed an overhang and also figure out whats the best method for mounting the roof. Like Ive described many times already, research on the internet quickly yields no certain answer. Attach the panels to the deck some say. Lift the panels off the deck others say. Theres catastrophic results with evidence for both methods. So. Whatever.

The solution. The metal roof will be lifted off the deck by 1x4s and then the 1x4s are lifted off the deck by 1x3s running vertically. Why? Cause I want to.

The metal roof may very well last my lifetime. In the event of a leak, buildup of condensation or some other water problem, the water can run out of the roof under the metal roofing. The sheathing is "weatherproof" zip panels with the seams taped. So theres two barriers for water. The roof should stop it all, if not, theres another exit before it penetrates the house. Conventional? No. Conventionality is boring and I like risk.

I always think about how to do things by myself. A backup plan for everything. I was fully ready to put on the roof myself if I had to. Ive been working on the house alone for a month but the roof was a project that some help would be...helpful. My brother and father came up for the weekend, with only minor hiccups the roof went on quick. Which is great because I quickly accepted this was not a lone wolf project, so thank you guys for the help.

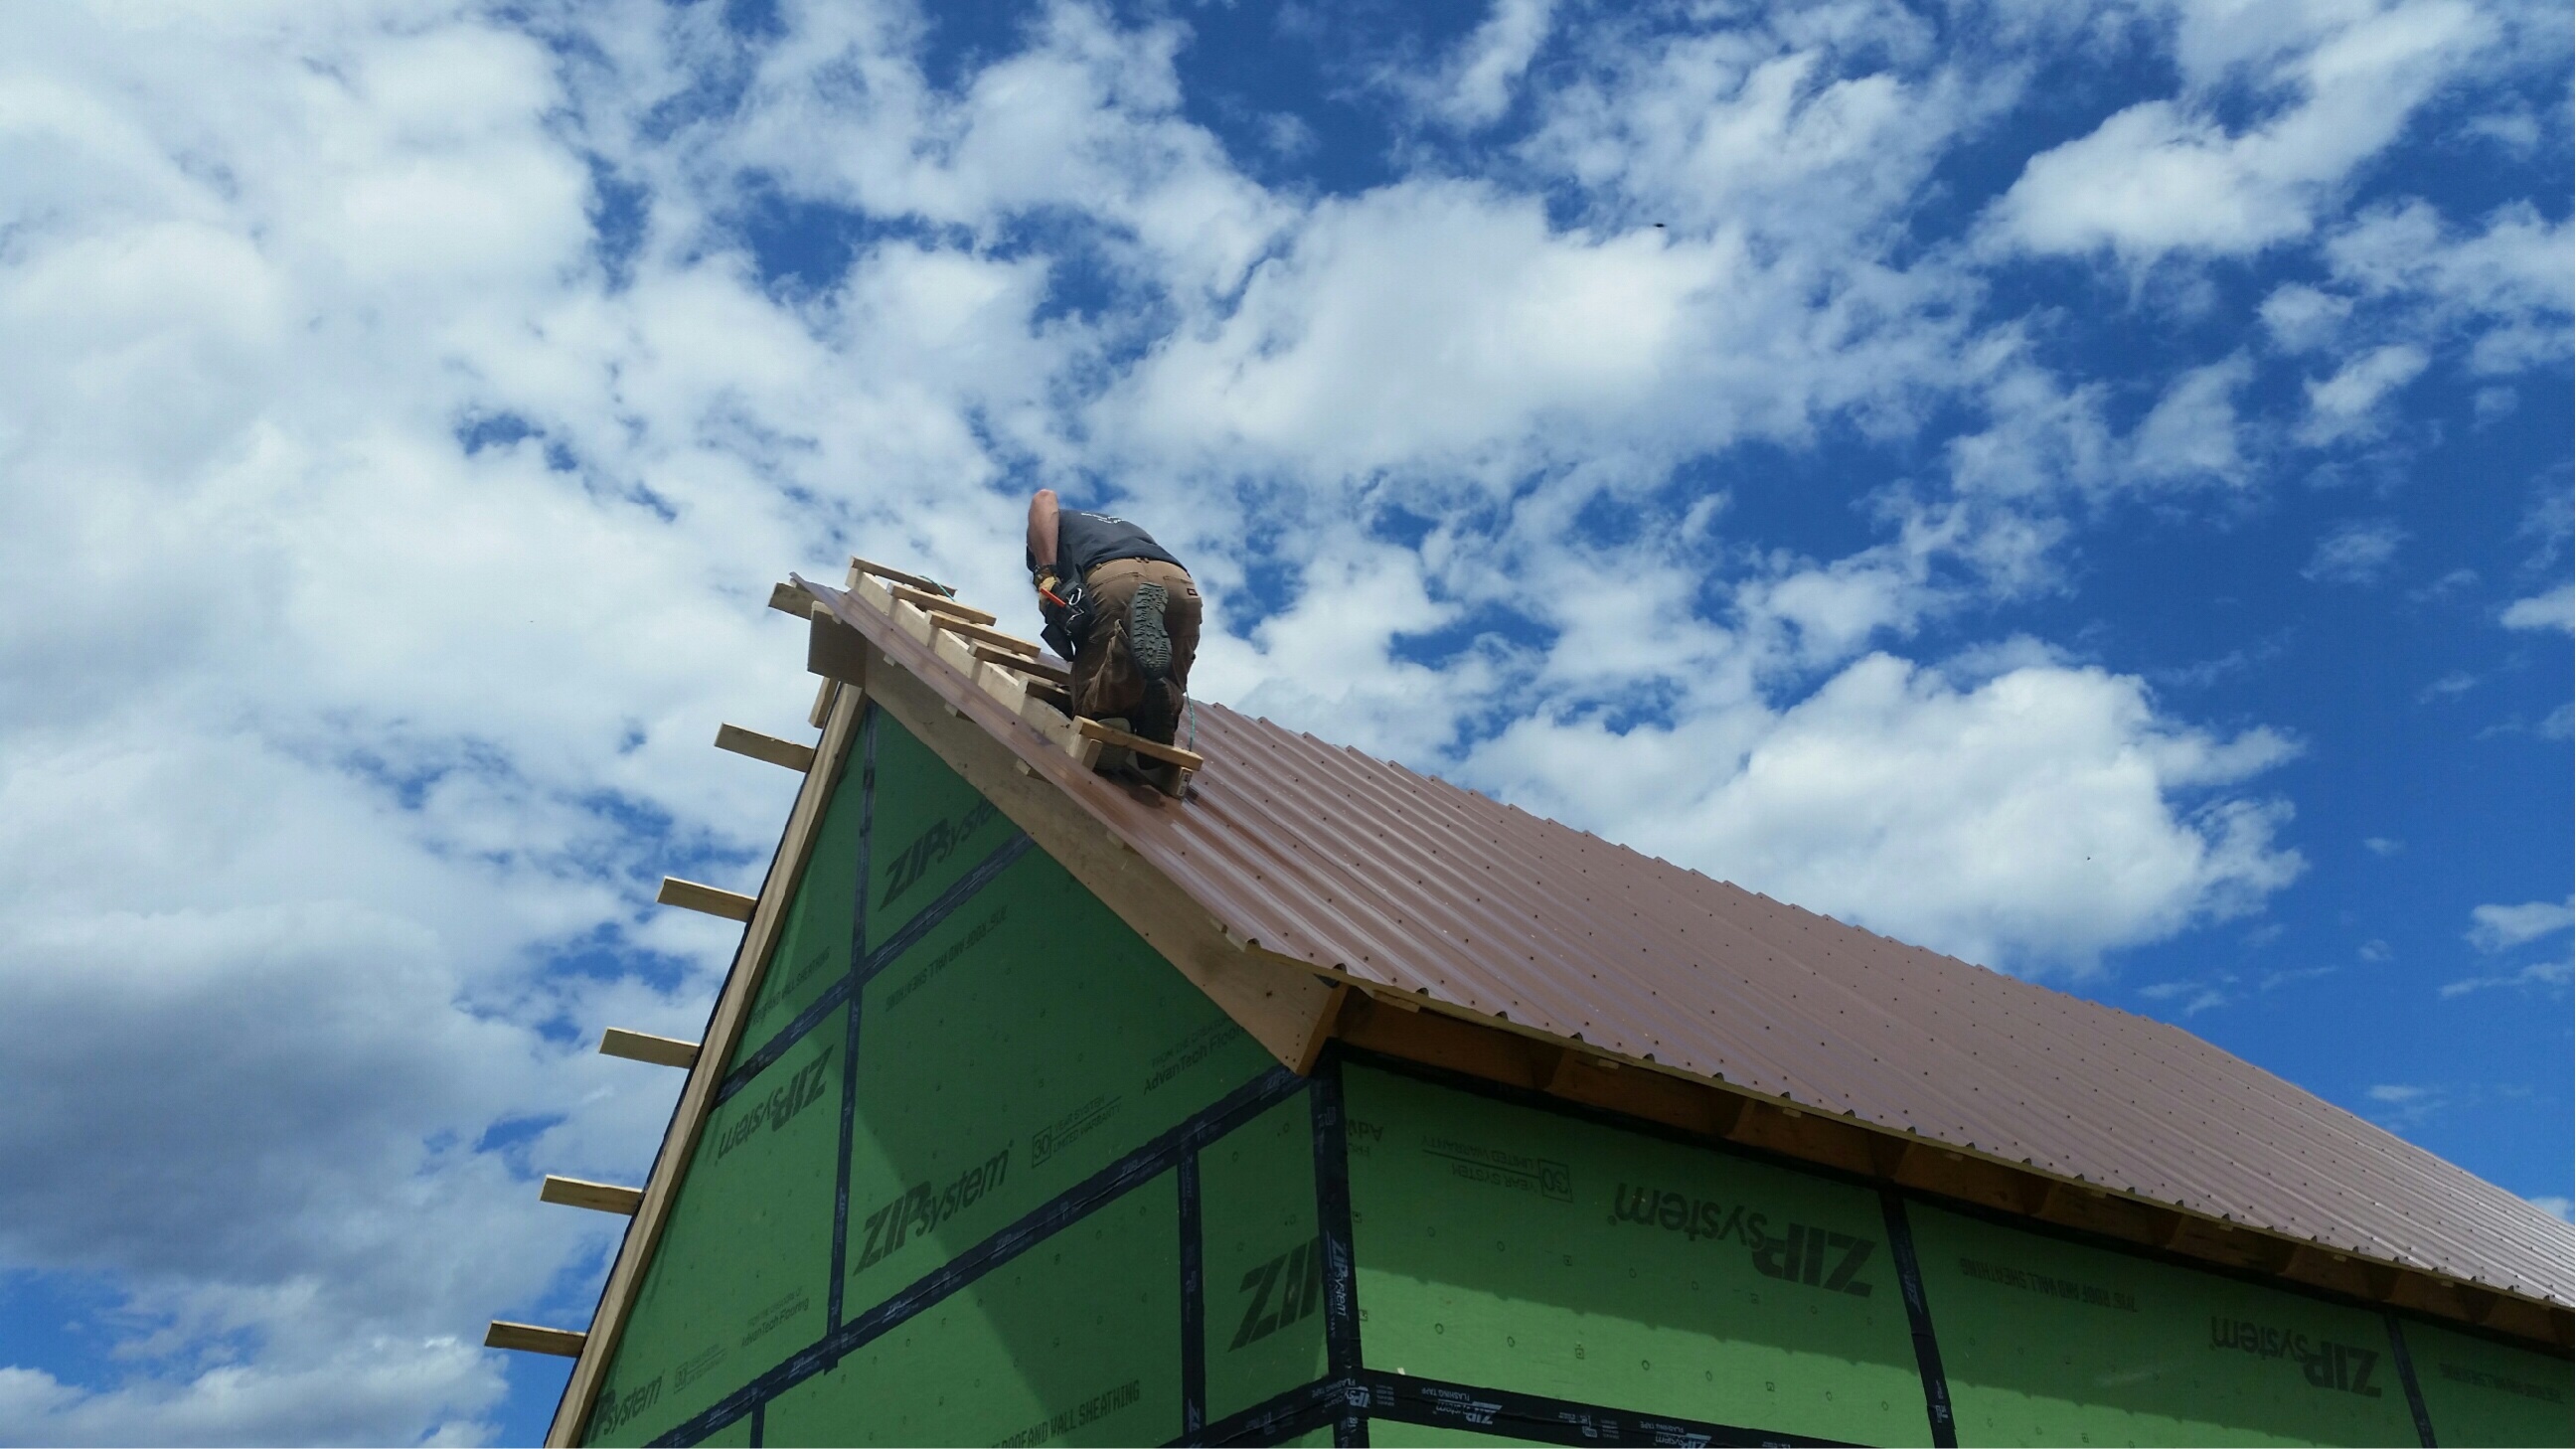
Almost. The ridge didnt have a solid answer yet as to how to do it. I figured I could straddle the ridge and scoot as I go. Once up there I was gravely mistaken. The lateral force on my knees was immense. Both felt like blowing out. No. This is definitely not the way.

I had to walk it off for awhile as my knees havent felt that punished in awhile. Time to think. After some group discussion, it was decided to try the peak ladder and just slide it little by little as I go, hoping to not deform the peak. I was frustrated and in Pain. Yeah Pain.

Yes. This will work. Slowly but surely. I could smell rain.

Done. Screw metal roofs (ha!)

Home is where you make it

And I make it here.

I dont think Ive ever been so anxious. Winter gave me plenty of time to think about what could go wrong. Alas, nothing did. Except the driveway was a muddy mess. The house stood where I left it and the tarp was still solidly in place. No signs of any water intrusion nor any critters. I made my living space in the container (previous post) and went straight to work.

Such a simple space, for a simple life. Dare say I love it. Bedroom in the loft and the main floor will be open kitchen/living room with a bathroom and utility room. More than ample.

Only walls in the whole house. The whole location is private so why bother making it even more holed in.

Just a side note for those ambitous people out there. I fully believe in the back to the land movement, I love what it represents. But let it be known I also love power tools. Last year I framed and sheathed the entire house with a handsaw and hammer. Yes Im proud. Yes I made it happen. But it hurt and took forever (comparitively speaking). I aint got time for that shiz anymore. Maybe some do and Im sure I could stay pure with no power tools but Id really like to see this project through and basic power tools saves immense time and wear on the body. I can thank my mother for them, a well appreciated christmas gift to us. For a few months straight I used them everyday and will continue to find/make uses.


For example. This staircase took a solid 8 hours with power tools (circ saw). Easily a week and a bad case of tennis elbow with a handsaw. Yea Im sold. Note the cedar support log. Ive become addicted to hunting for cedar logs in the woods that let mother nature cure them in a way that makes the bark fall off naturally. Its a real aesthetic boost to the interior. One of many unplanned advances. The empty space quickly took on the feeling of home, because like I said Im making it here.


Container life

After a relatively uneventful winter I returned to my new home. Yes. A shipping container. A twenty foot one at that. I purchased one last year to use as storage for building materials and ultimately itll become a workshop of sorts. The house survived winter just fine and now was the time to get moving on it again. April still saw snow and plenty of freezing temperatures. The container serves as a good half way house of sorts.


I grew rather found of living in the container. I abandoned the idea of building a home out of them, despite all the cool ideas on the internet. Its a trend, like most things. As I looked more into it there wasnt any solid benefits. In fact, there were more cons. Sure its nifty to have a weatherproof shell dropped on your land. Its a nightmare to insulate, completely imbedded with chinese pesticides and is hardly "cheap". I didnt give up on it completely though, last year I began insulating it and finished it this spring. Solid metal shells get very hot and very cold, oh and dont breath at all. A combination of guaranteed problems down the road. The only true answer is spray foam insulation which destroys any hope for cost savings. Since its not a permanent home I opted for my own custom design, an experiment of sorts. I read through a plenty of homestead blogs and figure someone else may come across mine. My advice is unless you can get the containers super cheap (less than $1000) then its not worth the trouble. Unless youre trendy, then have at it.

I basically framed out a box inside the container with an air gap on the top. Each stud bay I used 1" foam board which is suitable for subgrade installation so it wont grow mold or hold moisture. The entire interior was then wrapped in 6mil polysheeting, trapping the air between the foam board and interior wall surface (sheetrock). Unknown to many, air holds a R value, its the moisture and convection that negates it. Dry, still air provides some insulation. 3.6 R value supposedly per inch. Combined with the foam board total R value could be around 12. Who really knows. I dont care. All I know is it works and was perfectly cozy. Took off the temperature swings, heated up quick with the campstove and held the heat. Opposing vents were drilled out and a CO detector installed. Having a fire in a 19x8' space isnt safe by most standards and Ive had CO poisoning before.


On a windy day, with a mostly closed flue, CO levels did rise in the container. Its a real risk, be careful. Funny me saying that but I suppose a two week headache and being scared of falling asleep and not waking up did knock some sense in me.


I do recommend paying extra for the digital readout, kind of an early warning rather than waiting for the alarm to go off when it rises to dangerous levels.


In real time, I (we) are moved out of the container and in the actual house. So now the container will be serving as a workshop/gym. Such an odd sized space made it difficult finding a squat stand thatll fit the space. After months of hounding craigslist, I built my own. Out of wood. Yes. The biggest driving factor in my homestead mission is to have the freedom and challenge to do pretty much whatever I want. I love experimenting. I learn by pain and error. Thus, squat stand needed. Container life aint so bad afterall.

Tuesday, January 3, 2017

Adept

Building has always been in my blood. From legos to anything thats been broken. I want things to work. I want to know why they do not work. In the advent of the internet, knowledge is at the edge of a keyboard at all times. Much of it useless dribble. Ive taken what I know and mixed it with the new, thus embarking on a new kind of adventure. 2016 marked the year where I truly gave it all up in lieu of making everything my own. Im still not sure of Maine however I suspect my confidence will grow with time as it already has a bit. A home is being built. 


Earthwork. It all started with a hole. This hole is where the gate would be, representing the first change to the landscape of where home will become. 


Officially, its official. Spring brings mud and soon after the bugs. Its certainly not for everyone. Or really, not for most. The idea of not having good cell phone reception, no plug and play electricity and nights as dark as the stars allow is simply not mainstream. Perhaps romantic on the surface, it isnt very forgiving. 


First signs of shelter appear. Refuge from weather is now possible. 


What to build first? Ive read through many other stories of folks heading down a similar path. Theres a general consensus to first erect structures other than the house. The wood shed would be first. Or shack. Not really a shed. 


Keeping cut wood dry is of fairly high importance. Theres no sense of having a house if I cant heat it. Plus it takes time for it to dry hence why it was the first structure to build. 


Home site chosen. High and dry made the choice for us. Incredibly well drained soil, highest point in the clearing. Originally the idea was tuck the home in the woods but theres a certain appeal to having "big sky" available at all times. No worries of trees and branches falling on the home either 


Every real boy dreams of heavy machinery. Albeit a mini-excavator, the amount of work it saved me was immense. Roughing in the foundation and drainage was all I really needed. 


There will be no septic. Septics are costly and totally unnecessary. Two grey water drains run to a pit of stone. Simple and all thats needed. Well. Technically not needed but in the sense of convenience, its a minimum. 


Drain pipes in place and buried. Foundation roughed in. I was pleased how close I got it to its final dimensions. 


Theres no denying how much fun it is. Finished off a bunch of small earth work projects after I was done with the foundation. Gate needed a second post and 5 minutes later it was done. 


The state of Maine is beautiful. Part of what makes it beautiful is that its still okay to have an outhouse in most of the state. Regulation is minimal especially coming from NY. No its not completely free but its a good compromise. This hole will later have a sweet outhouse built on it. Not a priority especially since a primitive composting toilet works fine. 


The greywater pit. A bed of stone with a concrete distribution box buried in it. A layer of landscape fabric is placed on top and then buried completely under soil. The shower and sink drain will drain to this pit. Its considered a primitive system and I love it. Simplicity is my focus and it doesnt get much simpler. 


The concrete forms are up. A visit from my father helped kick start it as I found myself in a slump. The amount of work (and money) was far exceeding my plan. Actually, my plan didnt exist anymore. Originally I was going to build on concrete piers. I liked the idea of accessing the underside of the house and a concrete slab can be cold. Plus I understood the pier system. In a way I was scared of what I didnt know. After much lost sleep I settled on a monolithic slab, aka an alaskan slab, aka a frost protection shallow foundation, aka other names. Its a tried and true design that is still relatively new. I hated the idea of having footers going below the frost line especially in Maine. The cost was immense and didnt fit my ideal simplicity.  


Although the site was super dry, I had extra stone and added a drain to the low side of the foundation. Water should never get under the foundation. But if it did, it has a way out now. 


I had it in my head that due to many plan changes and being behind schedule I was going to wait until next year to pour the foundation. As a side project I framed out the inside of the shipping container with intentions to insulate it and heat it with a small wood stove. A simple yet incredibly effective shelter. 


But then things shifted again. I was filled with worry and it was time to set it aside and just do it, like I always have. A 6 mil vapor barrier is set down to keep water in the ground from getting to the concrete. Concrete is not as solid as one may think. Water can pass through concrete. 


2" xps foam board comes next. With taped seams it serves as a bonus extra vapor barrier. This insulation is essential to the design of a frost protected shallow foundation. 


Another design change. The cost of pex tubing is minimal. The hurdle of using radiant floor heating in an off grid home will be a challenge. However I am up for challenges and will figure it out later. 


Well. Its permanent now. Ive never poured concrete on this scale. Just minor stuff like a small staircase. It really is all in the prep work. Having the right tools, building the form level and square and heavily reinforced. I was dumbfounded by how easy and smoothly the concrete pour day went. All my concerns were squashed and for the first time I felt a sigh of relief that this project might work afterall. 


With the foundation poured, everything else was cake. Working on a surface thats level and square simplifies everything. Sill plates bolted down fine. Everything was measuring up within reasonable tolerances (1/4"). 


Moving here has a lot of hidden surprises. Like a lumber mill down the road. Its all from local forests, cut and planed to order. Cheaper than chain stores (that stocks Idaho lumber!). I was very pleased with the price and beauty of the lumber. Dropped right off next to our foundation it was go time. 


I was really, really looking forward to framing. One. Its easy. Two. It happens quick. Three. Its what makes the house start looking like a house. All summer was spent preparing for this day. 


Walls went up in two working days. No power tools. Just a japanese pull saw and hammers. The picture above is a great example of the "big sky" that northern Maine offers. Its already mid October but daytime temps were still warm and the sun shone brightly. 


Zip sheathing was to wrap the house. Conventional osb and housewrap didnt appeal to me. I really liked the idea of how zip sheathing is osb and housewrap combined. Costwise it really isnt much different either. One can waste many hours researching in the internet. Im happy with my choice. 


While the building continued, another big decision was made. The clearing needed work if we were to ever grow crops. The loggers left a heavy layer of mulch, sticks and small logs. Some weeds poked through. Clearing by hand was daunting but I didnt want the organic top layer to get scraped off by heavy equipment either. Again, one can waste many hours researching on the internet and never figure out what to do. The decision was really made by the guy I get gravel from. He asked about the clearing offered to clean it up for a good price. At this point in the adventure I came to terms with my own body and knew I just wanted it done. It cleaned up nicely and theres plenty of good soil that didnt scrape off. 2017 will have a major focus on rejuvenating this clearing with some hand work and perhaps the assistance of pigs. 


Things went up quick, largely in part because of my focus on simplicity. The house design revolved around basic measurements. Lengths were kept in intervals of 4'. Angles are all 90* and 45*. I dont like waste and in an effort to save waste of tried to use odd sizes of cut sheathing to fit around doorways. It was a complete headache. I reckon I barely saved any waste and only made things difficult. One of many lessons learned. 


I love looking at this kind of symmetry. 


Standing in the loft, which will be overlooking the living room as it is a half loft. 


Signs of moose were all over the place. Fresh tracks and poop. Finally one came around. I was surprised at how docile he seemed. Really didnt seem to mind my presence. The small antlers suggest hes a male of 1-2 years. His name is Bill. 


The roof sheathing was incredibly easy. As designed, I only had to make one cut. The hardest part was just the labor of hauling them up by myself. Like Ive mentioned before, researching on the internet can be so damning. Just when you think you decided you read something that reverses it. I had no question I was going with a metal roof. Metal roof is slippery and combined with the steep angle of a 12/12 pitch roof snow will slide off of it. Some say you dont need sheathing under a metal roof. I liked the idea of the cost savings but in the end, durability one. Having a weather proof layer under a metal roof sounds like a good way to resist leaks. Sometimes I cut corners and sometimes I over engineer things. Being that its a home that lasts most of decisions have been made towards over engineering. 


For example, hurricane ties. Not needed here. But they made placing the rafters a lot easier and adds a bit more strength to the roof structure. Plus I just like them. 


All the seams are taped. I put a tarp over the roof to resist any unnecessary wear on the sheathing until I can get a metal roof on it. I purposely didnt cut out the windows to help keep the place buttoned. Officially, the house is dried in. No signs of water getting in after a rainstorm. 


Winter is coming. My body ached more than it ever has. As much as I like the pride associated with only using hand tools, its a one time deal. The next house, or major project, Ill be gladly using a circular saw at the very least. 


My side project is intended to be an insulated workshop. Insulating a shipping container is tricky. Best way is spray foam but the cost makes it a total no go. Fiberglass collects condensation and soon creates mold. There really wasnt a solid solution. So I made one. Its only in theory at this point but Im confident in it and Ill naturally find out if it works or not. I used xps foam board as it wont hold condensation. Xps is expensive so I used 1" and some scrap left over from the foundation. The framing was 2x4 so I had a 3.5" space to insulate. I sealed the foam board in each stud bay with great stuff spray can foam, leaving a 2.5" air gap to the interior. The interior was then wrapped with a 4 mil vapor barrier. Effectively sealing the air gal into each stud bay. Air itself is an insulator, if its dry and doesnt move much.  The foam board has an R value of 5. Not that great but better than nothing. Dry air has an R value of 3.6 per 1". Since theres an 2.5" sealed air gap that should give me an R value of 9. Combined with the foam board thats a total of 14, very reasonable and much cheaper than trying to achieve that value with an insulating material.  


I put an old camp stove in it that was donated by my neighbor. I easily cooked myself out but more impressive was how long the container held the heat after I let the stove go out. Short term I think itll work great. We'll see how it works long term. 


The big sky gave me a treat before I left. I wasnt supposed to go back to NY for winter. But a lot of other things didnt go as they were supposed to either so, whatever. Amazing things fell into place that I never expected. 2017 has so much in store for it. The dream is very much real, we'll be back soon enough.